
-

- hey, where is my heater core!?
-

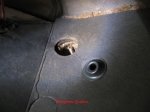
- These holes are where the posts on the back of the assembly go… there are some speed nuts inside the cab that must come loose, to remove this whole unit.

-

- “I fall to pieces… “
-

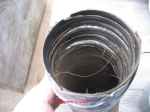
- the offending leaky core
-
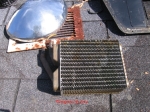
- another shot
-

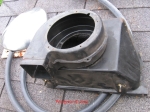
- how it sits in the assembly/box
-

- those black brackets snap on the ends, you screw the brackets back down to the cover/plate there
-

- the bracket on the other end
-

- reinstalled
-

- see those brackets?
-
- this is where the blower fan goes…
-
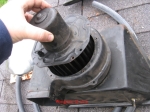
- like this, see?
-

- pay attention to the little bump on the housing… helps you line it back up
-

- this square outlet goes into the hole in the firewall

-

- make sure you put this screw back in, before you put it on the truck
-

- another screw
-

- remounted
-

- kinda tight

-
- speed nuts
-

- terrible photo, but there is a speed nut in this area.
-

- see the light!? that’s where it goes!
-

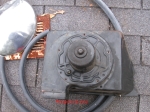
- this plug snaps on/off the heater control valve box, I had to take it loose to get to the speed nuts
-
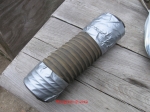
- the old heater hose came apart on me… had to improvise until I can procure replacements
-
- you can see where it went all ‘slinky’ on me…
1965 Chevrolet C10 – heater core re-assembly
O’Reillys has this heater core in their system :
Murray – Heater Core
Part Number: 398224
NOTE: after I went though all of the above with the heater core… the blower motor fan started going out/making a racket…
Taken from the heater blower motor squeal thread on the Stovebolt page, from a post I wrote on 03/14/2012:
OK… using an excellent tip from Wrenchbender Ret.(thanks W.R.!), I got the cage loose… take the nut off, hold or have someone else hold the fan, then tap on the shaft… once it is flush, use a punch or a small screwdriver, etc.. to tap it on through. pop. It is off. Yay.
An issue I had with the replacement motor:
(from the parts stores)
Siemens VD0 PM102
This motor is longer/deeper and did not want to go back into the heater housing space with the fan on. This is a problem.
I didn’t want to pull the entire heater core and housing unit again, as above… unless I absolutely had to, so I did some thinking.
This is what wound up working…
I took my new motor and plugged it in and laid it down on the fender and the exhaust manifold so that it would get a good ground… why? To test it and make sure it works before I went through all of this hassle… it zoomed along nicely. OK, turn it all off, unplug it and let the aggravation begin…
I looked at the old fan and the new fan… lined up the holes that were used and I marked the ones I needed to use on the new motor with a white paint pen(which I had laying around, cuz it is handy for touching up the white grill on a beat up truck, but I digress)…
I removed the cage fan from the motor. I put the cage fan up into the housing and slightly on the bench inside so it wouldn’t fall back down, then I wiggled the motor into the space, dropped the fan back down onto the shaft and then had a slight tussle with trying to get it to line up on the shaft. Then you have to wiggle the nut onto the end of the shaft with yer fingers and not really being able to see it(use the force!) and run it down finger tight.
Once it was lined up and dropped down, there was not a lot of room, so I leaned the motor at an angle, with the cage fan still stuck partly in the housing, and used a small crescent wrench to slip in and tighten the nut down onto the shaft.
I found that putting in the first screw, in the hole on the motor, which faces the front of the truck, gives a nice pivot point to work the other two side front holes for putting it all back into the housing.
I used a ratchet, 1/4 deep well socket (space issues) one short extension and 1/4 regular socket, depending on which screw I was running in.
Remember to plug the fan connector back in on the back!
Maybe all of that will be useful to someone in the future if they are stuck doing this.
It blows the air real strong through the ducts now… whoo hoo.
-W
EDIT : this issue with the blower motor not sliding back up and in may only be an issue because of the later model v8(1992 block 350/5.7L) in my truck, I dunno. That is what is in there, so that is what I had to deal with. It may not be an issue in a 327 truck or a inline six, I don’t know… but, thought I’d mention it, in case.
You should also read this : Heater Assembly Restoration – by Burgie
I had to do this repair job again and I took more photos this time, you can see them here :
04/19/2017 – heater core replacement – 44 pictures

You must be logged in to post a comment.